What is Retargeting?
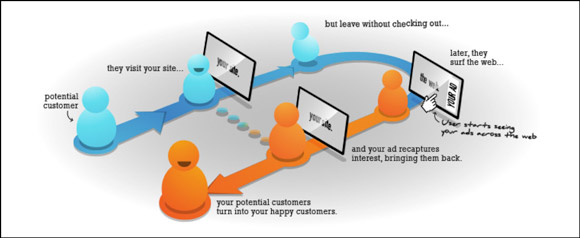
Have you ever checked out a product on Amazon and then later you saw it on Facebook?
This is retargeting. “Retargeting is a cookie-based technology that uses a simple Javascript code to anonymously ‘follow’ your audience all over the Web.
Facebook recognized that you visited Amazon because Amazon added this discreet bit of Javascript code on its site sometimes referred to as a pixel. Then this automatically allowed Amazon to show you an ad based on the URL you visited.
Although you didn’t purchase the product, Amazon still has an opportunity to turn you into a customer even after you visited their site.
Despite the fact Amazon has tens of millions of monthly visitors, this method will work for any amount of traffic – even if your site only gets 100 visitors per month.
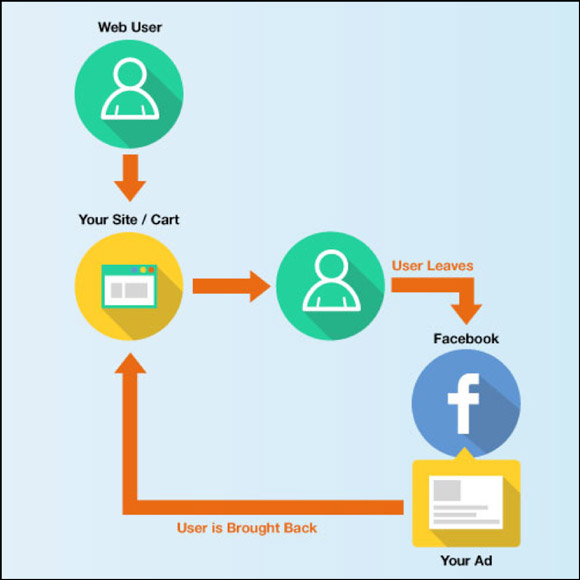
This is how it works: a javascript code or pixel is placed on your website.
The code drops an anonymous browser cookie, every time a new visitor comes to your site. The code, or pixel does not affect your site’s performance and is invisible to your site’s visitors.
Once your cookied visitors browse the Web later, the cookie will let your retargeting provider know when to deliver ads, confirming that your ads are delivered only to people who have previously visited your site.
What makes retargeting so effective is because it centers your advertising spend on people who are already acquainted with your brand and who have recently demonstrated interest. This also allows you to get even more creative and/or aggressive with your advertising because they have already seen you.
Tip: This is why most marketers who use it see a higher ROI than from most other digital channels.
Going Forward – What to Expect?
If you aren’t planning on having any traffic to your site within the next six months stop reading this post. Retargeting is something that you should do right now, and if you aren’t ready to drive traffic to your site, them get ready.
This strategy is:
1.) A way to take advantage of current organic traffic
2.) A way to take advantage of current paid traffic
3.) A way to increase organic traffic
4.) A way to increase paid traffic
Setting up retargeting pixels is essential whether you are about to run your first Facebook ad or whether you already have 100,000 unique visits a month.
Why?
Because if you don’t have 100% conversion rates on each page (no one does) and you pay for traffic, wouldn’t you like to build an audience of folks who didn’t take you up on your offer, so you could hit them with a secondary offer?
Retargeting can change your entire traffic game and although not EVERY ONE of the following steps within this plan will apply to you, utilize and attempt to understand the process so that as your traffic grows you will be able to take full advantage.
In the past, the focus was on list building. How large can you grow your list. Today, with the ever decreasing of email open rates, building a list is not as effective as it once was. Last year, Ryan Deiss discussed it is a focus on getting your pixel on as many computers as possible. That was the new focus. With that said, in this plan you will see how to use Facebook Website Custom Audiences and SiteScout to do all of the retargeting you will ever need.
Today we are choosing to retarget on Facebook. Once you get experience with retargeting, Adroll and Perfect Audience are third party resources that you want to expand to in order to reach other audiences. This falls under the ideology of “don’t put all of your eggs in one basket”.
First, we will review how to use content to segment our Facebook audiences to “prime the pump” per se for running traffic.
Next, we will look at how WCA (Website Custom Audiences) can be used to set up effective targeting for funnels.
Then, we will talk about SiteScout and how to set up display retargeting.
Getting Started with Facebook WCA
Basically, Website Custom Audiences (WCA) is a feature of Facebook advertising that allows you to run ads to individuals who have landed on your site.
If someone visits your site, whether they’ve come from an organic Google search, a Facebook ad, a link that a friend sent them, an email, etc. They will be cookied by Facebook and therefore re-marketable by you.
Not only can you retarget people who have landed on your site, WCA allows you to get MUCH more specific than this.
You can retarget people who have landed on a distinct webpage.
With a specific keyword in the URL, you will be able to retarget people who have visited any webpage on your site. You can retarget people who have visited a certain page, but not another page. The possibilities are endless.
This method has two ways in which Website Custom Audiences can be retargeted.
The first approach is how we direct traffic based off of the content users visit on our site.
The second approach is how we actively retarget people who have visited our funnels.
Adding Facebook Pixel Code
First, you will need to install the proper code in order to build Facebook WCA audiences.
This code should go somewhere inside the website and <header> tags on each page of your site.
Depending on what your site is built on, you should be able to paste the code into your header template that applies across every page of the site.
If you can’t figure out how to install the pixel, don’t let this technical intricacy get in your way. You may consider hiring someone on Fiverr or leverage Youtube/Google to search for the process for the system that your site is built on.
Facebook has step-by-step instructions.
Once that is completed, move on to the next step of categorizing your WCA’s.
Using Content to Categorize Your WCA’s
Learning how to set up Website Custom Audiences to segment the content on your blog/website is the first place you should begin when retargeting via FB WCA. Even if you don’t have content on your site yet, continue reading so you can plan/have a general understanding.
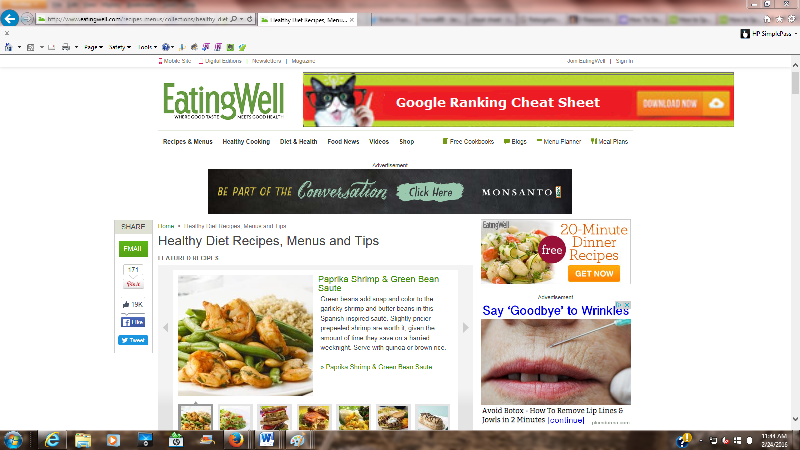
Looking at the Facebook ads below, which ad do you believe will get more clicks from a Vegan vs. clicks from Vegetarians?

Or this one?…

Not too hard, right? This is a “distinguished offer”, which is focused on the exact type of group you are looking to market to. It’s about making the right offer to the right people. That’s just Marketing 101. And it is simple to do with Facebook WCA.
Here’s an example…
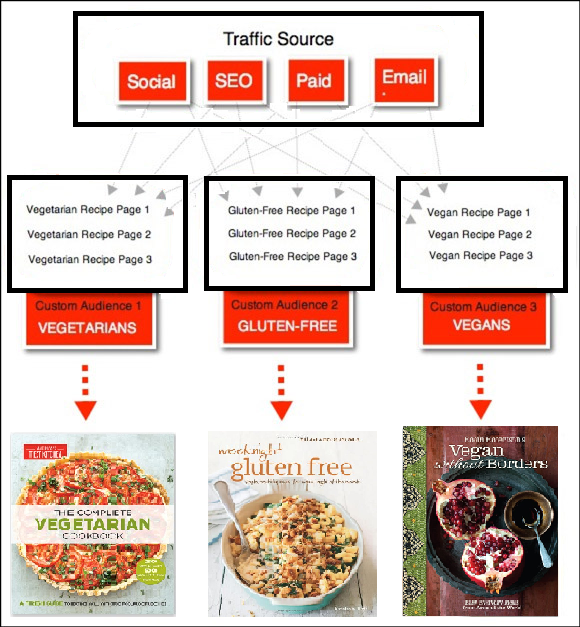
There are content pages on a website on the following topics:
Vegetarian Recipes
Gluten-Free Recipes
Vegan Recipes
Those pages get traffic from places like Twitter, Google search, Facebook Ads and emails they send to their subscribers.
Unsurprisingly, the pages about vegetarian stuff is visited by Vegetarians, the pages about gluten-free stuff are visited by gluten-free folks, and the Vegans, well you get the point.
Facebook Website Custom Audiences allows you to make a list of people and run ads to them based on the pages they’ve visited on your website.
Now, this is how it looks. Envision the ability of crafting lists of people that have:
Established an interest in a topic (Visiting your page about it)
Established an interest in you (Visiting your site)
Presently, all that’s left is making the right offer to the right list.
If we were looking at your website, how would you go about using the content to build a laser focused list (and offer them exactly what they want) in Facebook?
Do you have “categories“ on your blog? Those would provide an excellent starting point for sectioning your blog into WCAs. Let’s look at setting up your WCA Content.
Setting up your WCA for Content
You will want to begin by creating a document like the one below, if you have existing content on your website.
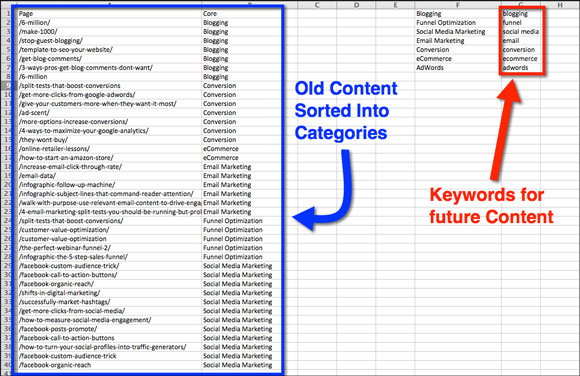
In this example, all of the pages that are getting traffic; the URLs are listed into the categories such as Blogging, Conversion, eCommerce, Email Marketing, Funnel Optimization, and Social Media Marketing.
Consider the most valuable way to categorize your website content based on your audience and niche.
Then, the keywords have been created (as you can see in red), will go into every URL of new content generated in the future.
This ensures that URL’s don’t have to be continually added to the website custom audiences. This will be on auto-pilot!
It’s time to create your website custom audiences, once you’ve determined your categories and structured your existing content.
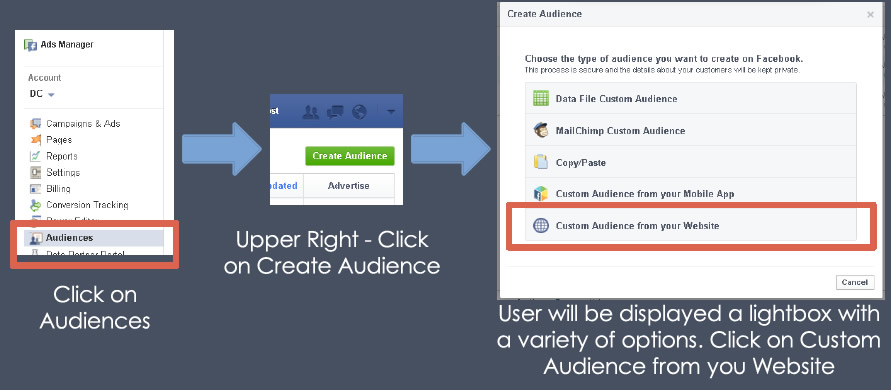
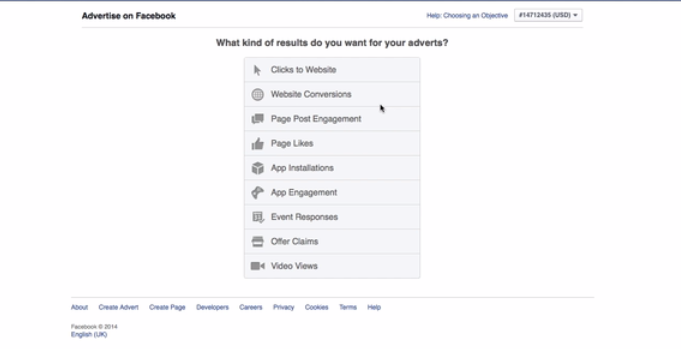
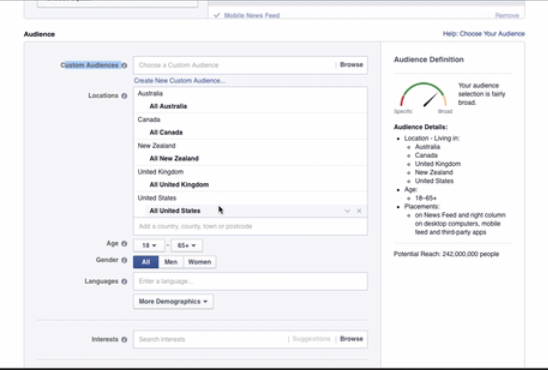
Log in to Facebook and go here. Inside your ads manager you will find the audiences tab.
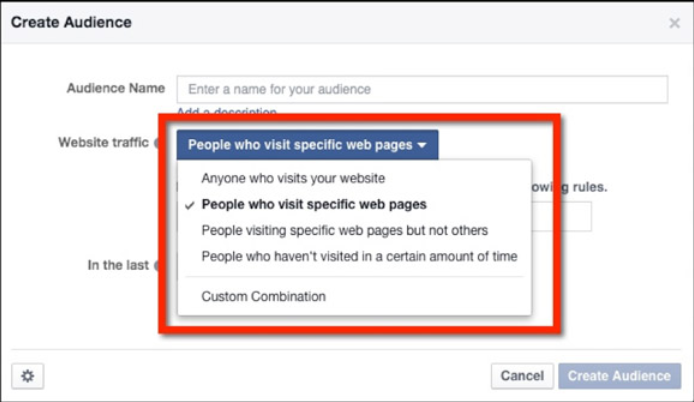
You will be prompted to choose the type of audience you want to create. Choose “Custom Audience From Your Website“.
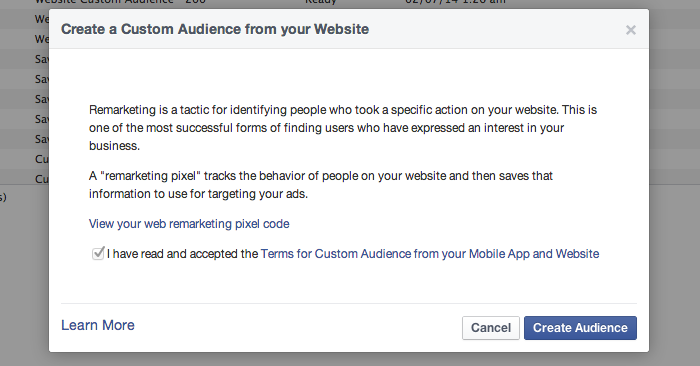
Next, you will need to accept Facebook’s Terms of Service and click Create Audience.
Now, it’s time to set up your website custom audiences. From the excel document, as an example, we will start with the first “category”. Blogging.
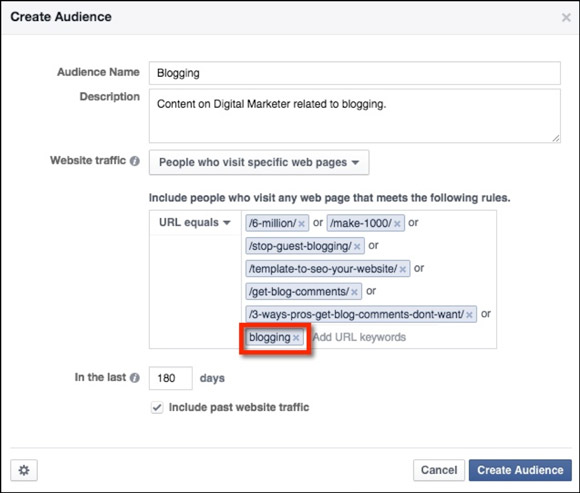
Audience Name: Name the audience something that you can remember. I name them the category of the content to make it easier.
Description: This is optional, however, it’s a useful way to add more detailed information for yourself.
Website Traffic: When setting up categories to subdivide your audience, check “People Who Visit Specific Web pages“.
URL Equals: As you will notice, all of the URLs (the text after the .com – the root domain) of old content have been added from the excel sheet in the category of blogging. Also the keyword “blogging” (highlighted in blue) is added to guarantee that each page we make from here and forward on that has to do with blogging will be added to this WCA — as long as it contains the word ‘blogging’ in the URL. This is awesome because you will not have to come back and edit this audience again.
Save For: Facebook will let you go up to 180 days however the default is 30 days. Generally maximizing the length at 180 days will keep people in your audience for as long as possible.
However, remember you can create many deviations of these people who have visited a post about blogging in the past 5 days, 1 month, 2 months, etc.
The audience tab will appear in the your ads manager once you submit the customer audience.
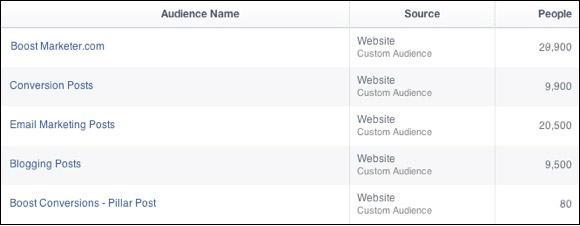
You will notice that under “People” your audience will show <20. It may appear this way for a day or two depending on the amount of traffic to your website.
It is okay if you don’t have traffic to your site right away. Don’t be concerned if your audience doesn’t start to populate immediately as it may take time. You have these set up to boost traffic once it comes/you buy it.
This same process was used to enter all of the categories from the excel file.
This way, you can categorize the FB custom audiences into distinct topics. If there is not a way to categorize an audience go ahead and set up a WCA for everyone who visits your site at all – why not? You may follow the steps above by merely placing your site address in the Website Traffic Area.
Next, we will talk about Funnel Retargeting.
Funnel Retargeting
In terms of Facebook Advertising, funnel retargeting can be a huge game changer in your business. Why? Because it is awesome!
You are already aware of what Facebook WCA is, an idea about how to set it up, and how to manage them in correlation to the content on your website (if you have any).
However, why not retarget the people who have come into your funnel?
You already know how to run Facebook ads to get people into the top of the funnel (lead magnet landing page).
But what if your audience decides to only opt in?
However, what if they didn’t purchase the tripwire and only opted in because they didn’t have a credit card handy?
What if you could REMIND them to proceed to the next step of the funnel that they may have exited out of yesterday?
How about if you were able to advance 5, 10, or 20% MORE people to the next phase of your funnel?
Because most marketers never follow up with a prospect after they’ve left their funnel they are leaving BIG money on the table.
The process of how to retarget throughout the funnel is pictured below:
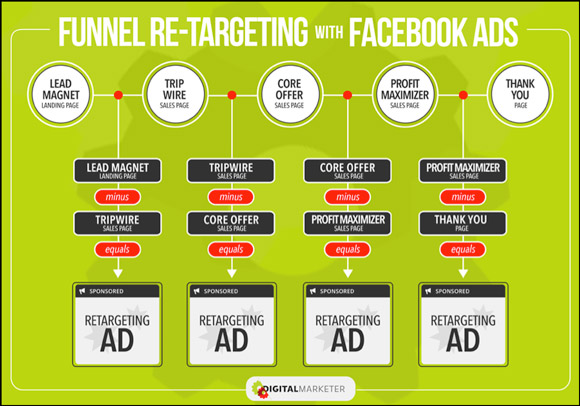
If you don’t have each step of the funnel in place, that is okay. You can apply this information to retarget based off of your funnel make-up.
Go ahead and set up an audience of people who have visited the landing page however who didn’t convert to the thank you page. It is time to take advantage of this remarkable feature!
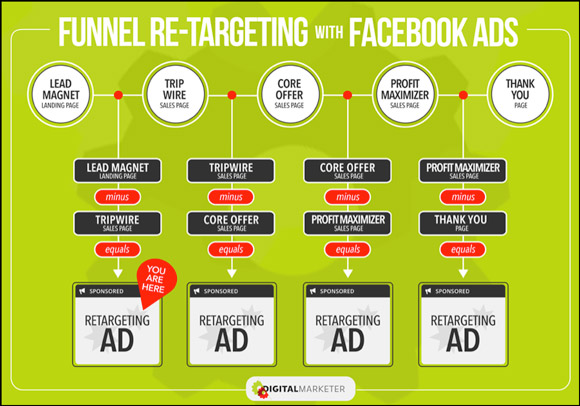
If a visitor lands on the lead magnet landing page, but not the tripwire sales page, an ad is run to those people to remind them of the lead magnet offer (see below):
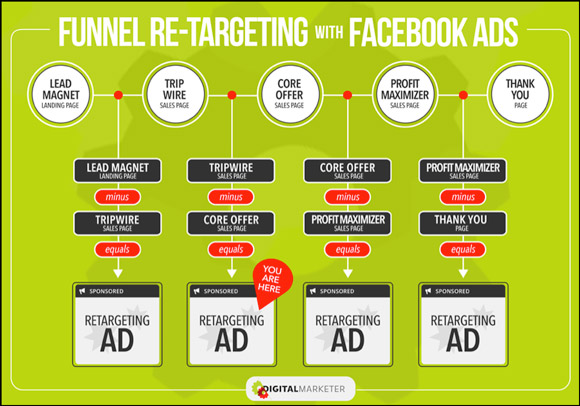
If a visitor lands on the tripwire sales page (which means they opted in for the lead magnet, it’s the next page after they optin), and doesn’t go to the core offer sales page, an ad is run to those people to remind them to buy the tripwire (see below):
If a visitor lands on the core offer sales page (which means they bought the tripwire), but doesn’t land on the profit maximize sales page, an ad is run to those people to remind them to buy the core offer (see below):
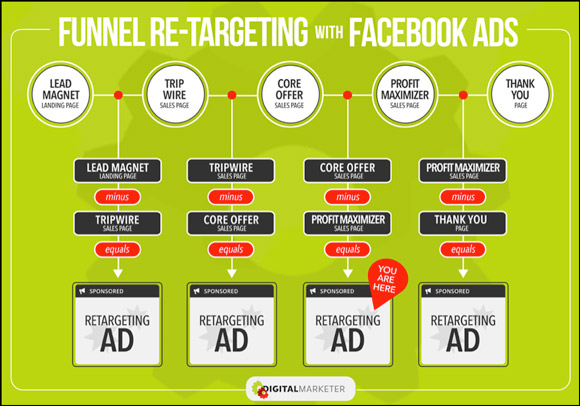
If a visitor lands on the profit maximizer sales page (which means they bought the core offer), but doesn’t land on the thank you page, an ad is run to those people to remind them to buy the profit maximizer (see below):
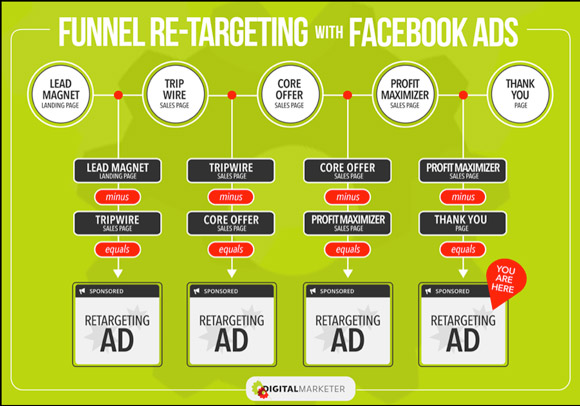
Fundamentally, 4 diverse ads are able to run to convert people to the next step of the funnel if they may have fallen out at any point.
With the assistance of Facebook Website Custom Audience a system has been established that allows you to set up a funnel instinctively.
So, let’s talk about how this works.
Creating Audiences
Now, let’s look at how to set up the audiences using Facebook WCA for funnel retargeting.
Go to your ad manager and click “Audiences in the left had menu to set up Website Custom Audiences and then “Create Audience” and “Custom Audience” in the right hand corner.

Then select “Custom Audience from Your Website” when the lightbox appears. (See Below.)

For example, we will use the second retargeting ad that will encourage those who have opted in to buying the tripwire. (see below).

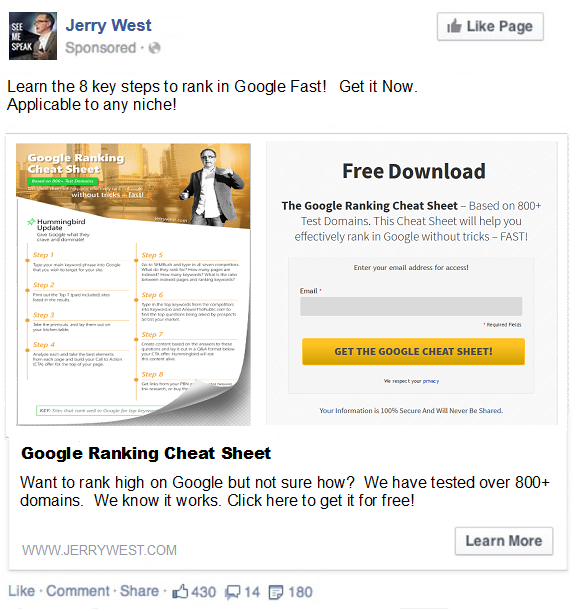
I’m going to use our Google Ranking Cheat Sheet funnel as an example.
These individuals would have opted in on this page (Lead Magnet Landing Page):
http://jerrywest.com/cheat-sheet/
And therefore would have landed on this page next (Tripwire Sales Page):
http://jerrywest.com/cheat-sheet/confirmation-2/
Once being offered a couple of other tripwire offers if they purchased the “I Want To Rank”Tripwire, they would have landed on this page (Core Offer Sales Page):
http://jerrywest.com/i-want-to-rank/?transaction_key=s02Jxo7ic3j21NW2O5woq9X35At9pISA
This example shows how to target people who didn’t purchase the tripwire:
![]()
In the image above it shows how we create the audience for people who have not purchased the tripwire.
I use the naming method of “Funnel Name – _________ Retargeting” – however you can name the audiences whatever you like.
Now you will notice that we selected “People who visit specific web pages but not others”. This is the advantage of WCA – it will populate this for us automatically!
Then, we place the part of the tripwire sales page URL that’s past the root domain (www.jerry.west.com) in the first box, and then the part of the URL past the root domain of the core offer sales page in the second box… to exclude people who did purchase.
You can create a variety of audiences (3 days, 7 days, 1 month, etc.) to get more relevant with your retargeting. However, Facebook will let you keep the audiences for up to 180 days, which is normally the time period you should select that time period.
Once you click “Create Audience” you’ll see your audience in the dashboard.
Be aware, it may take a bit of time for your audience to begin to populate depending on your traffic volume. You need 20+ people to visit the specified pages before Facebook will begin building the audience.
From here, it’s time to set up the ad.
You can do so by clicking “Create Ad” next to the audience you want to target:

You may repeat this process for each step of the funnel that you have in place!!!! Create as many audiences for your funnel as you have steps + create an audience for everyone who hit the domain so that you always have that as a resource. Next we will look at creating your Ad copy.
Ad Copy/Creative
It is so important to maintain consistency no matter which step of the funnel you are on, when creating the retargeting ad.
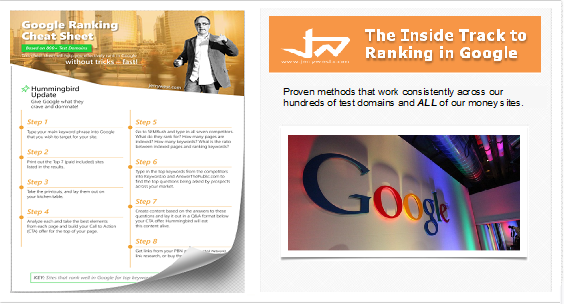
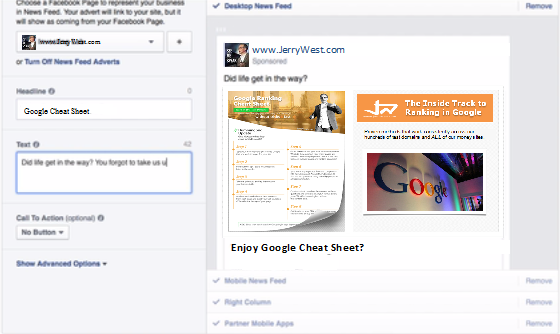
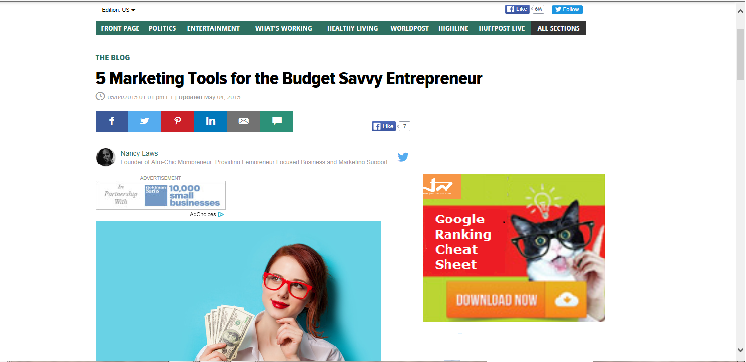
An individual for example, may have come into the funnel from an ad to the lead magnet landing page that looks like this:
Below is an example of the Tripwire which is the retargeting ad they’ll see to encourage them to make a purchase.
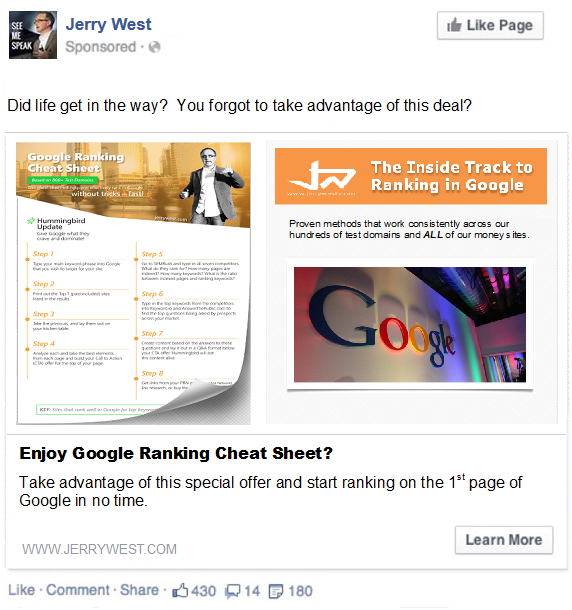
As you can see the ads are somewhat alike. It is best to grab their attention by showing them something that they are already familiar with, but at the same time create a bit of variation so that it does not appear to be the the same ad.
You will notice that the the second ad says “The Inside Track to Ranking on Google” – this is because the tripwire is a guide that gives insightful information to ranking high on Google.
Keep in mind that the copy is the most relevant thing. The retargeting ad uses the words “Did life get in the way? You forgot to take advantage of this deal?”.
This is an excellent copy you can use for EVERY retargeting ad. It is always applicable and can save you from writing a ton of copy.
This uses a psychological move and it also presumes that they didn’t say NO the first time when they saw the ad. It assumes that they may not have had their credit card handy, that they could have been distracted by their children or may have been at work, etc. Now, let’s move on to setting up your retargeting ads.
Setting up your Retargeting Ads
Now, it’s time to set up ads to retarget people along each segment of your funnel.
When setting up ads to run traffic to the top of your funnel…the lead magnet in that circumstance you want to place the conversion pixel on the tripwire sales page. Then you will optimize your campaign for conversions.
Things are done a little differently for retargeting ads. Since the retargeting audiences are reduced and you recognize they are slightly interested in your message… that changes the way you bid and what you optimize your ads for.
With retargeting ads we convey to Facebook that we want clicks as this is what we want. We want people to re-visit the page and so we remind them about an offer that we have.
So how does this work?
This is relatively simple– and you can initially set up the ads and let them run without a great deal of management.
So let’s take a minute and speak about setting up ads for website conversions and how this differs. This is really important when you are running traffic in the top of your funnel.
So when you are sending a bunch of traffic to your lead magnet to generate leads and you want to get people through your funnel using website conversion and conversion pixels that is the absolute best practice in terms of running to the top of the funnel.
Our goal today is not to run people to the lead magnet landing page. We are trying to push people who have hit every other page in the funnel to the next steps. We want them to continue to purchase and hit the thank you page.
You should have already created the audiences to your funnel. Your audiences will continually change and probably be fairly small as you get to the end of your funnel. They could be as small as a 100 people. This will change the way retargeting ads are run.
You will want to retarget for someone who has opted in but did not buy the trip wire. So you will want to choose Clicks to Website. At this point, we want to tell facebook that we want these people to visit the website page that we specify here.
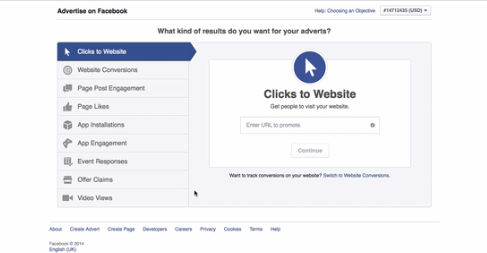
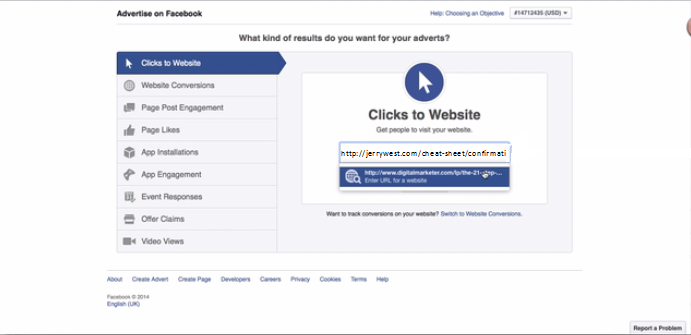
This is because the audiences are small and they are interested. We just want them to click over to the next step. You do not want to add a bunch of pixels and complicate things as this audience is already targeted. In the screenshot below we will place the URL (http://jerrywest.com/cheat-sheet/confirmation-2/) of the tripwire sales page to Clicks to Website because they opted in and they did hit this page but they didn’t buy. So now we want to send them back.
Next we want to use the tripwire image.
We want to keep it similar to the copy for the lead magnet but the copy for the trip wire is a little different so they are familiar with the ad and will possibly want to click on it. Now we want to add the image in and for the text for the retargeting ad we want to ad the following words“Did life get in the way you forgot to advantage of the offer.” as seen below.
You will want to run different ads for all desktop mobile and different placements. You want to remind them of your ad. You can go into Google Analytics to see what countries have hit your ads and target those countries unless you are targeting local or just to the US.
Next, name campaign as whatever your original campaign was and then just add the word – retargeting to make it easier to keep up with your campaign. In the example below I chose the name Google Rank – Tripwire Retargeting.
![]()
As for your budget you can budget $5, $10 or $20 a day. Of course if you have a smaller audience you will want to bid less and if you have a larger audience you will want to bid more in the $10 or $20 range or higher.
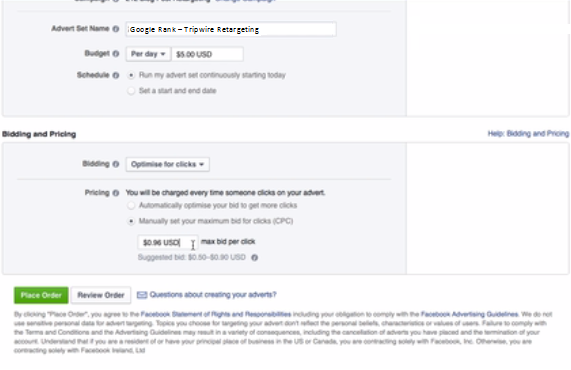
It all depends on the size of your audience. You do not want to continuously show the ads if they are not clicking. It is good to choose ads for 3 days to see how they are doing. Under schedule in the above screenshot you will want to choose to run your advert set continuously. Next we will move to Bidding and Pricing.
Bidding and Pricing
In the screenshot example below, you will want to choose optimize for clicks under the header Bidding.
Now, you will see that the suggested bid is 90 cents. A good rule of thumb is to bid at least 6 cents above the suggested bid. You will want to bid 6 cents higher to make the max bid 96 cents per click.
Understand that you are not going to pay this amount as you are bidding 6 cents over so that you will clearly win the advertising space. You also want to make sure that who ever is bidding on these specific people and not that they would be bidding on your retargeting but that these people may be targeted from other brands and other companies; so you want to make sure you win the ad space and that your ad will be shown. This means the click rate will be higher and therefore you will pay less. You will want to bid the highest(6 cents above the suggested bid) so you can win the ad space and get a high click through rate.
Facebook likes high click through rates because they make money as it is teaching people to click on their ads and therefore your cost will be lower. The next step is to place the order (hit the green order button in the screenshot above) and then just follow the same structure to set up your retargeting ads. Now, we will look at Banner Advertising.
What and Why –Display Retargeting
Now, let’s jump into retargeting with display advertising.
One of the simplest forms of advertising when it is used for retargeting is Banner Advertising.
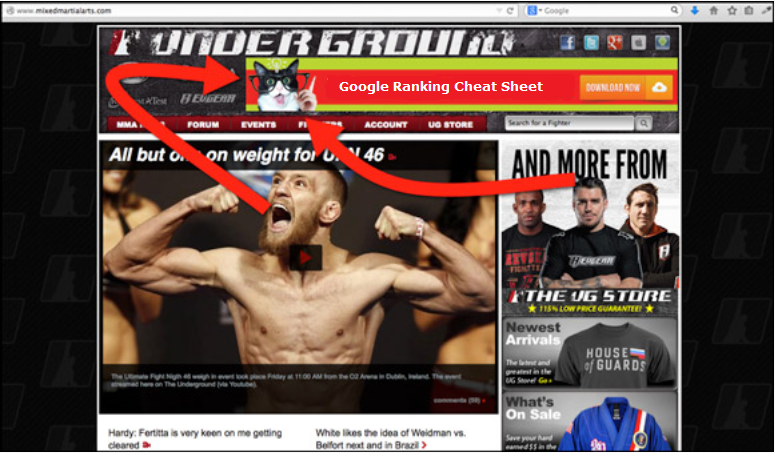
Have you ever went a website and then noticed a banner from the website that you had visited previously? You were being retargted with a banner ad.
A pixel is set with display advertising, just like you would with Facebook WCA. Then a banner creative is submitted that will show to your visitors as they surf around other websites.
You can have 2-3 display retargeting ads running at once. They will remarket to anyone who lands on your site, and the banners can go straight to the lead magnets.
Display advertising is considered on of the best remarketing tools because the ads appear within the web page that the individual is visiting, serving as another reminder to take you up on your lead magnet offer.
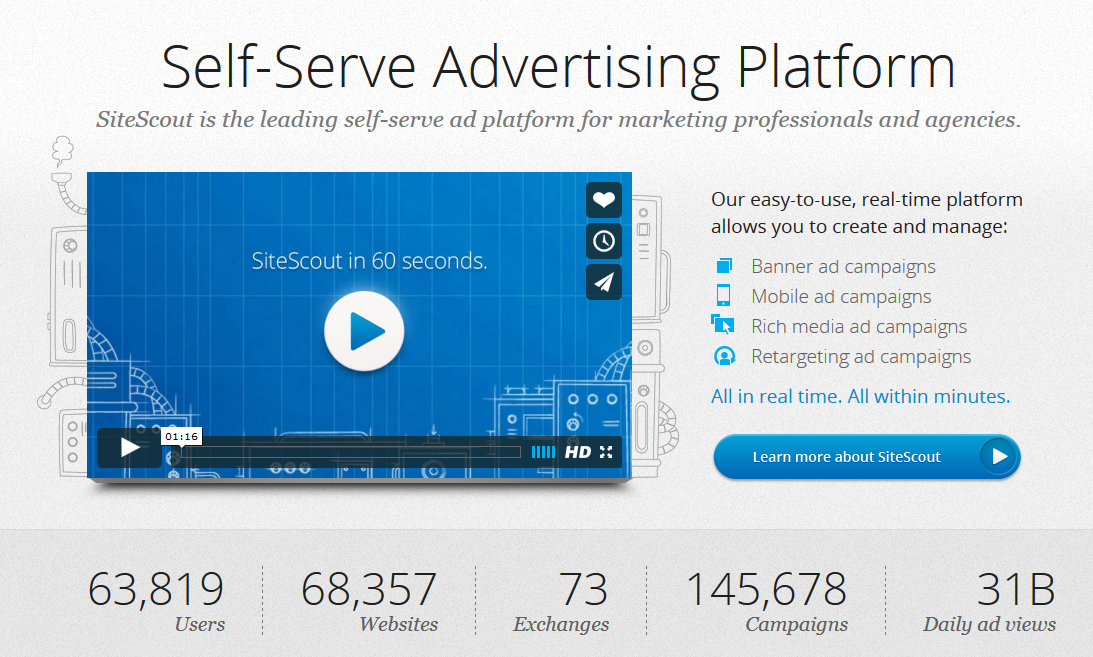
SiteScout is an excellent platform to use for this method.
This resource lets you use multiple traffic networks including Google, Rubicon, OpenX and many other networks that generate over 30 billion ad views with the SiteScout service.
With this platform, all of your campaigns will be simple to view and easy to navigate. So let’s look at the process as it pertains to retargeting banner ads to get them up and running.
Setting up Banner Advertising
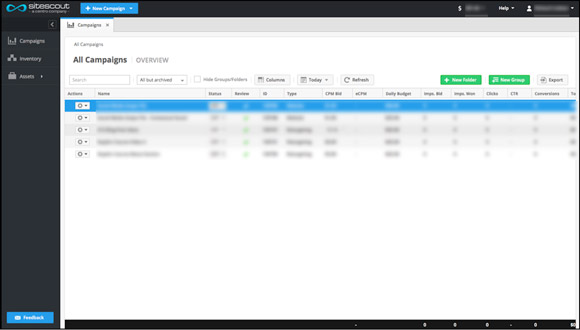
To begin using sitescout you will want to first set up an account by going to www.sitescout.com. Once on the site, you will see the user interface.
Even though there are several ways to to create banner advertising objectives you currently want to click on the “Assets” then “Audiences” tab for our retargeting campaign.
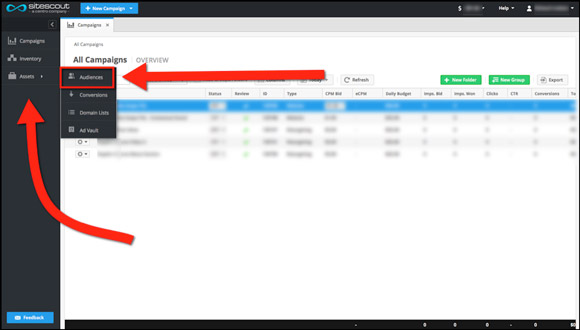
For our retargeting campaign this is where you can create our custom audiences.
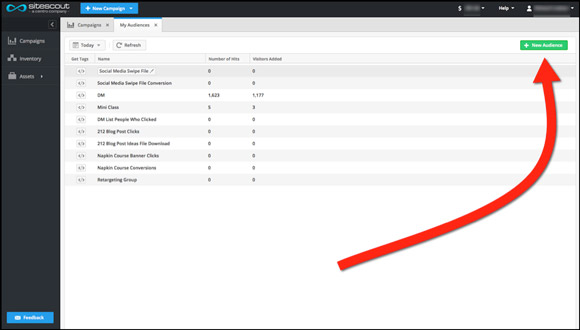
Click on the green “New Audiences” button in the upper right corner. This will open up a box where you can name your audience.

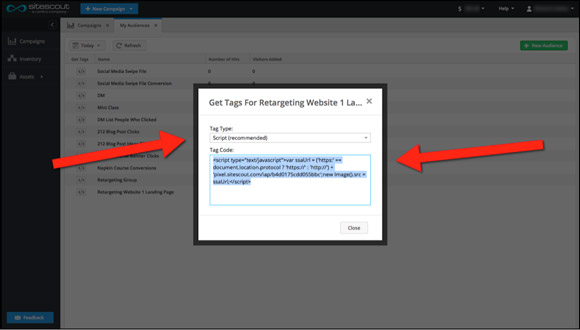
Setting Up Your Tags
The next step is to click on the little “Get Tags” button to the left of your audience name.
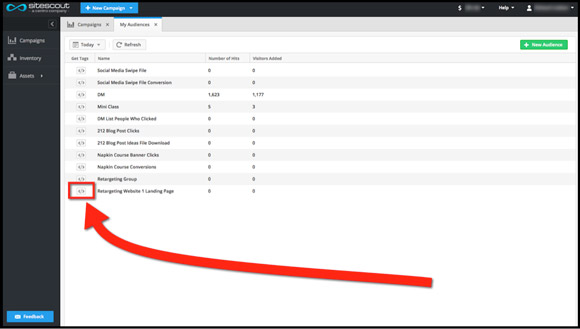
Now you can choose from a selection of “Tag Types” however you want to choose the recommended “Script” version of this code. Then you want to copy and paste this script to the page that you are using to collect this user data for retargeting.
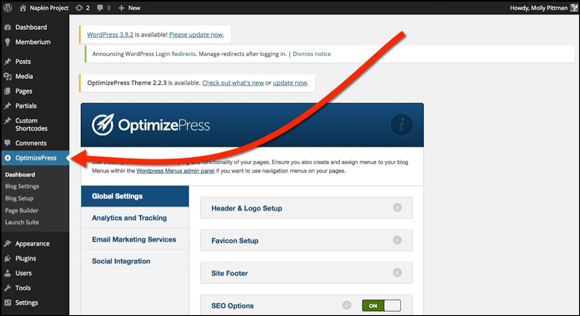
For this example while using OptimizePress 2.0, you can see how to paste this code, but remember depending on the platform of your site this may be different! Now we log in to the backend of OP2 and then click on the OptimizePress tab.
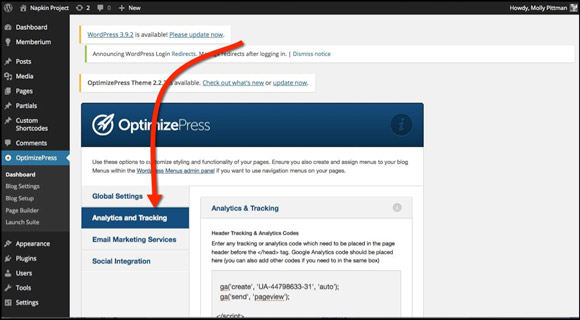
Under Dashboard, click the “Analytics and Tracking” tab.
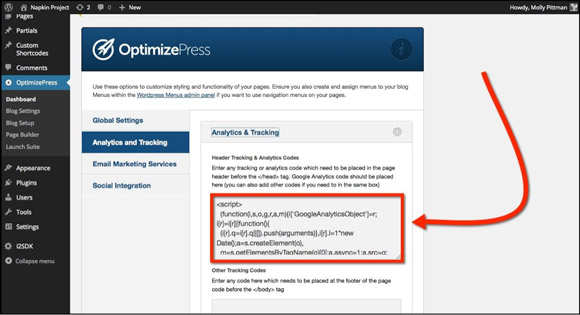
This is where we are going to paste the code that was given from SiteScout. This will now catch all of the people landing on any page within this domain.
We then press save and we are prepared to proceed to the next step.
Now you can head back to the SiteScout dashboard and click on “New Campaign”, “Desktop”, and “Retargeting Campaign”.
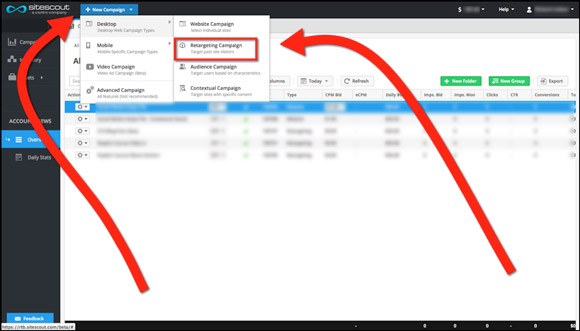
This will take you to the Retargeting Campaign builder.
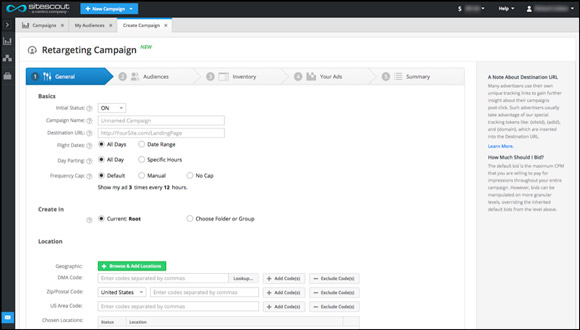
Setting up Your Campaign
This can be set up in a variety of ways but I’m going to show you a simple yet effective way to create your campaign.
You want to leave the “Initial Status” as ON so once the ad has been approved the campaign will begin running.
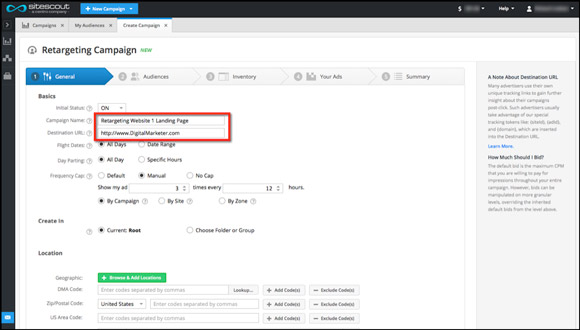
The “Campaign Name” will depend on your personal preference for naming purposes however in this example it will be called “Retargeting Website 1 Landing Page” so it is easy to recognize.
So we can collect as much data as possible throughout the day we will leave the “Flight Dates” and “Day Parting” to All Days.
Under “Frequency Cap” you can choose whatever you believe is appropriate for the amount of times you want a single person to see your ad. This ad will be left to the default “Root” folder so the campaign can easily be seen.
Leave the locations to only target the United States however you can obviously change this if you want to broaden your ad exposure.
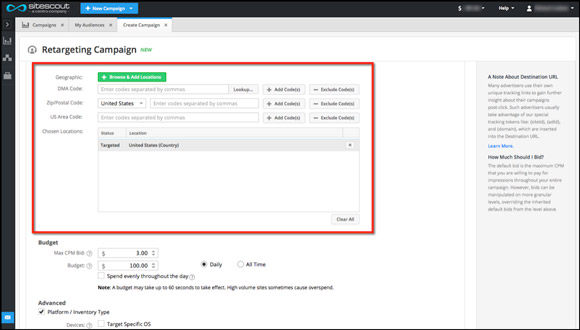
Next under the budget you can choose what you want to spend for your max CPM or cost per thousand impressions.
Take into account that this is defaulting to $3 however that doesn’t automatically mean it will spend that amount.
The bidding system you are using will adjust your spend based on the amount a competitor is willing to spend against your ad. When starting out you should probably make a low budget test between $5-20 however you will want to adjust your budget accordingly.
It is best to set the budget to “Spend evenly throughout the day” so you can gather as much data as possible on your market.
We will skip the Adanced section to keep this section relatively short but understand that you have the ability to click on the “Capture Audience” feature. When using this feature you can choose to add user actions with your ad to another list.
This is huge if you want to create new lists based on people who interact with your ads for upcoming promotions.

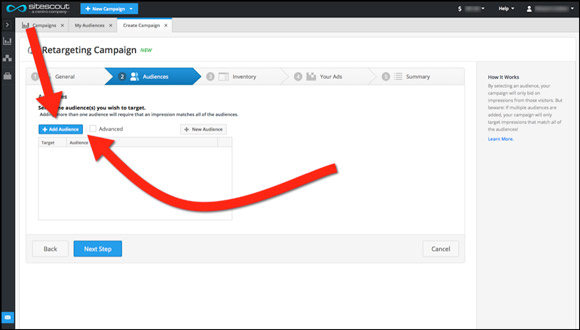
Once you click on the next step you will be able to select “Add Audience”.
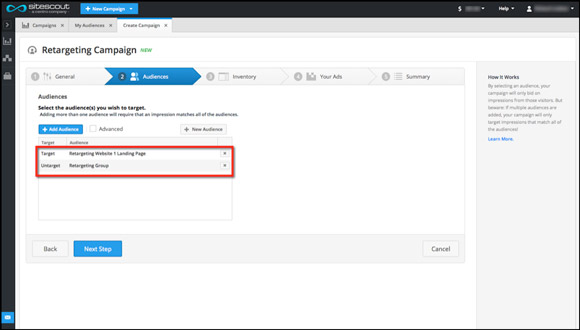
Now you can choose our retargeting list we have just created.

You can also elect to add an untarget list to exclude a specific list of people for this retargeting campaign. For example people who visit the landing page are added to the list however when they visit the Thank You page they are added to a new list that prevents them from being exposed to your original ad again.
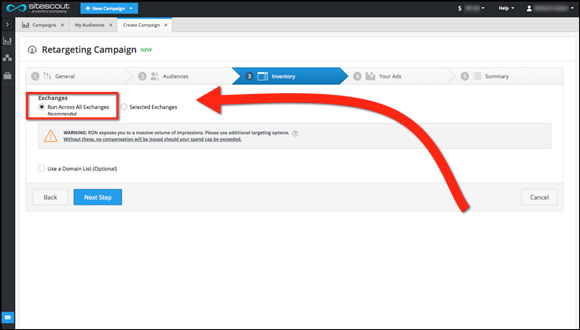
Once you click on the next step you are given the option to choose the ad inventory. Now select either “Run Across All Exchanges” or “Selected Exchanges”. This basically allows you to have your ads shown all over the available websites or only shown on specific sites. Normally you want to choose to use the run of network however be mindful you may have your ad shown on less than ideal sites that allow for banner ad placement.
Next we will click the “Add Creative” button and “Upload Creative” to upload our amazing banner ads.
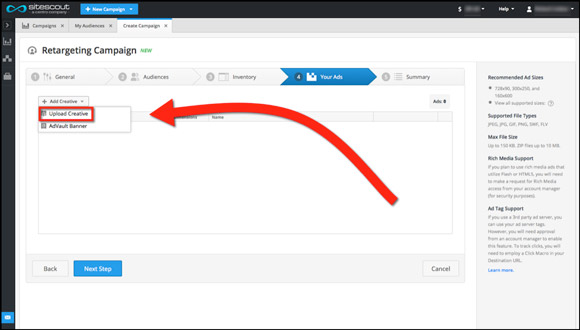
Now highlight your file and begin uploading.
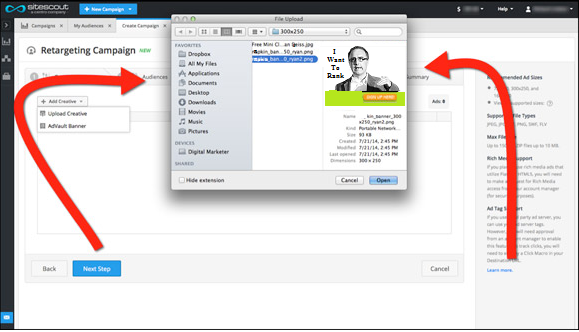
We move on to the next step once all of the content is loaded.
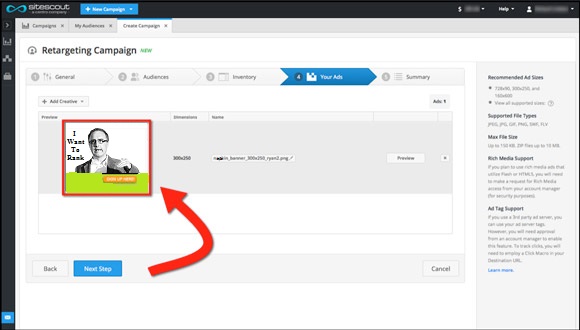
Then the campaign is ready for review to make sure it is all looking good and ready to launch.
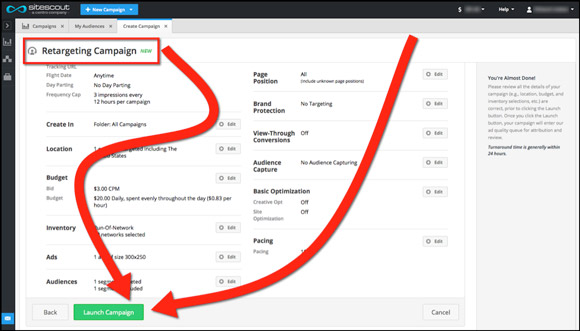
Click on the green “Launch Campaign” and you are ready to go!
Using Display for Market Research
When your list starts to increase users and you start seeing some data from your campaign to get the best results you will want to go back and critique or stop times of the day, ad creatives, placements and adjust other settings.
Now your ads should be running on different websites.
Consider this….once you obtain a reliable amount of data from the different ads you can begin to look for trends such as popular websites your prospective customers visit regularly and you can determine if it’s worth creating new ads for cold traffic on these popular sites.
This is an excellent way to do market research and learn what other sites your visitors are frequenting so that you can buy display ad space on that particular site or perhaps even target that company on Facebook!